Threshold Review: Active Sky XP
March 1, 2019
Copy Provided
Copy Provided
HiFi Simulations has just brought what I consider the best weather-generating program for FSX and Prepar3D simulator to the X-Plane platform for the first time. Using a hybrid weather depiction interface through X-Plane 11’s weather API, a realistic, high-performance and high-fidelity weather experience is realised.
Features:
- Active Air Effects: Replaces internal X-Plane turbulence and air effects, providing enhanced turbulence, drafts, thermals, terrain-based wind effects, surface friction, gusts, variability, wake turbulence, microbursts and more.
- High-Performance Weather Depiction: Uses internal X-Plane 11.2x/11.3x cloud depiction for maximum performance and smoothness, with multiple weather depiction modes including theme cell “real weather” mode and global static mode – VR compatible and optimized.
- Active Sky Weather Engine: An evolved version of the Active Sky platform brings the core features that made Active Sky the leading weather engine for the other simulators: Advanced weather synthesis and interpolation, high-resolution winds aloft, realistic air and atmosphere effects, a comprehensive weather data network, integrated visual mapping and planning and more.
- Voice Weather Delivery: Active Sky ATIS and Flight watch are available at any time by listening on 122.00, 122.02 or 122.05 for the closest station, destination weather reports, and the FSS weather briefing.
- Surface Crosswind Attenuation: Optional, for better ground handling in crosswind conditions while preserving headwind/tailwind component for performance accuracy.
- Mobile Companion App: Use any device/browser to connect with Active Sky over your network and view and control the weather.
Limitations:
- Not a complete visual cloud rendering replacement: HiFi Simulations has put their previous X-Plane visual cloud rendering replacement efforts on hold (expected 4th quarter 2019), due to performance considerations and changing API environment/tools that are not yet finalized. Active Sky XP features high-performance cloud depiction with a focus on conditions accuracy, utilizing the X-Plane internal cloud rendering via a hybrid API approach with two different modes available. ASXP also features an optional high-performance photo-realistic cloud texture replacement with a simple texture installation wizard.
- Windows 64-Bit (v7 or later) Only: Mac, Linux and 32-bit X-Plane/Windows versions are not supported. In a networked environment, the ASXP application/client may run on Windows 32-bit (still Windows 7 or later). HiFi Simulations hope to add support for other OS/platform support in the future.
- X-Plane 11.26 or later (64-bit for Windows) is required.
Requirements not Already Mentioned:
- Active or stable internet connection (broadband recommended)
- 500MB available hard drive space
- 1GHZ+ CPU
- 2GB+ RAM
- OpenGL 3.3 graphics device (Nvidia GTX 500 or better)
- 1024x768 minimum available screen resolution to display all of the user interface features.
To read common question and answers visit the product page here.
Installation
Currently, Active Sky XP is only available from four stores, Simmarket, Justflight, FSPS and FSPilotshop. For X-Plane users that prefer other X-Plane retailers, HiFi Simulations has said they will see about adding other retailers for distribution. The user manual does not say to do this, but I recommend uninstalling other weather generation programs before installing Active Sky to avoid conflicts. It is compatible with X-Plane texture plugins, so you can try these with Active Sky to see for yourself. I have Ultra Weather XP installed and plan on keeping it installed because I like the textures that it provides. Make sure the simulator is closed and run the installer and follow the prompts.
The first thing is to install the ASXP Connect plugin which is required for proper Active Sky XP functionality. After this, you will be asked to log in or create an Active Sky online account which is also required for functionality. Create an account completing all the requested information. The account will enable secure usage of ASXP on any compatible computer, at any time, if you are only logged in once from one location at a time. After your new account is verified you will be asked for the order number and serial key. After this, ASXP will start and if you want to want to install the optional cloud textures, select “Textures” from the left side of the program interface. The two options are “High Performance” (lower resolution and softer looking clouds) and “High Resolution” (more detail, harder edges and more cloud types). For review purposes, I tried both and will display exterior screen grabs in the next section. A 72-page PDF manual is included which clearly explains all the functions and features which is wonderful. The manual is also available to download from the HiFi Simulations website to read before purchase and I like when developers provide this service so that the end user can decide if this is the right program for them before purchase.
Getting Started
X-Plane’s weather mode needs to be manually changed to “Custom METAR” mode when using the ASXP default weather mode. For those new to X-Plane, from the Flight Configuration screen, Weather Options, from the drop-down menu select “From Custom METAR (.rwx) file” and select that file from your main X-Plane directory. If you use the ASXP “Global Static” depiction mode, use the X-Plane “Manually Configured” weather mode but remember to use the custom METAR file when you switch back to the other Active Sky weather modes or your weather will not look correct.
Unless it is already running, start the ASXP external program and the program interface will look like the first screen grab below. I will comment about the toolbar on the left and the tabs on the top later. For now, select the “WX Control” tab.
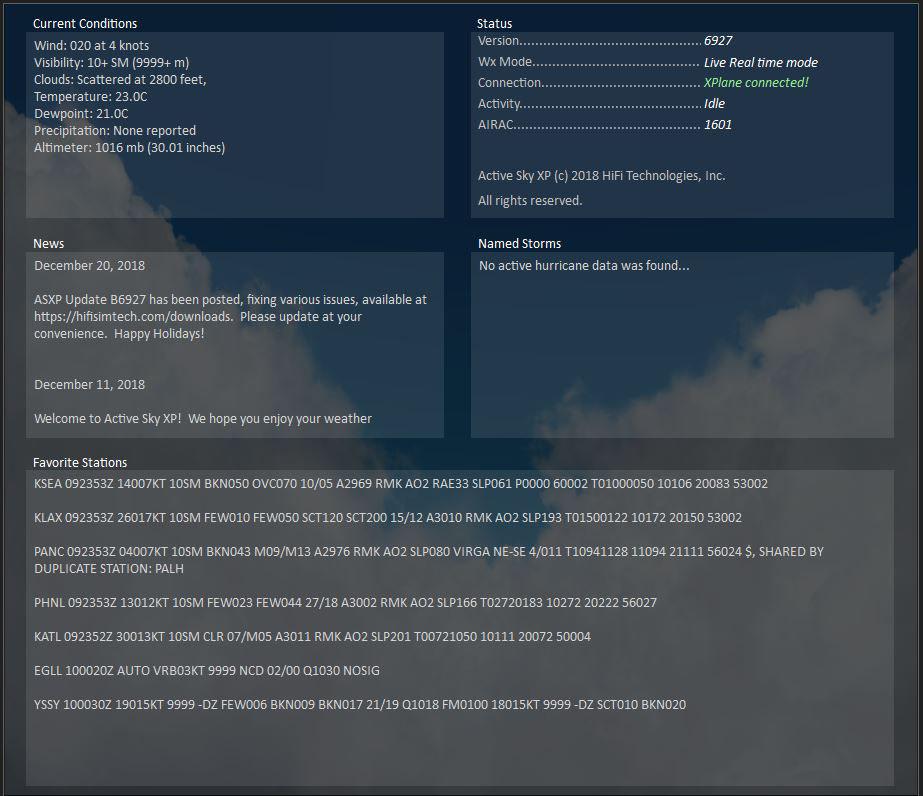
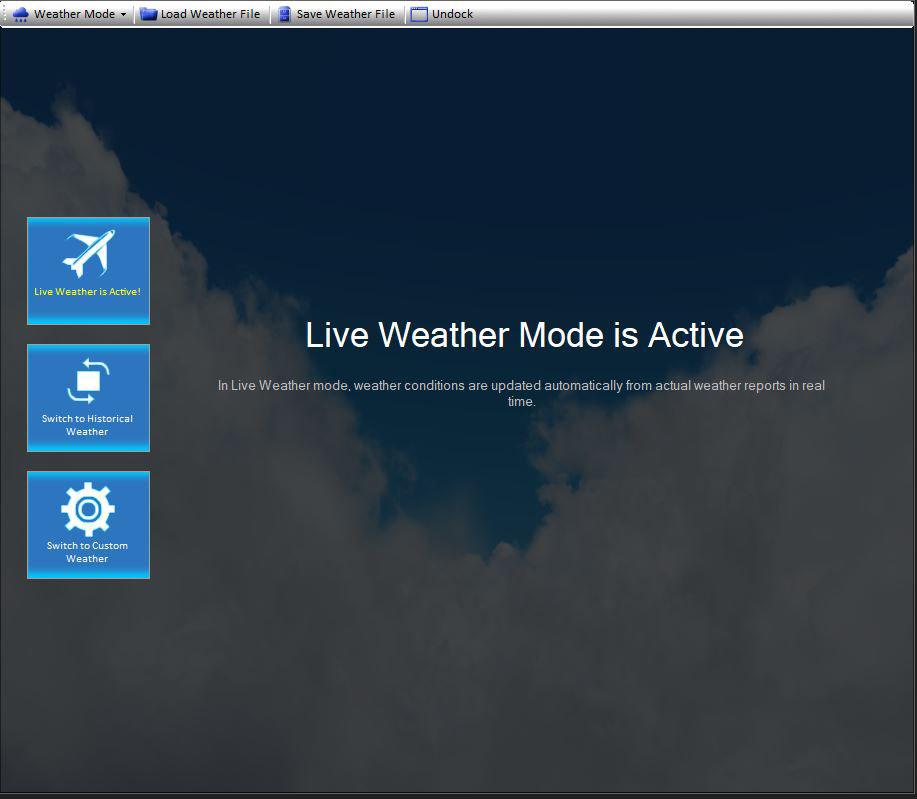
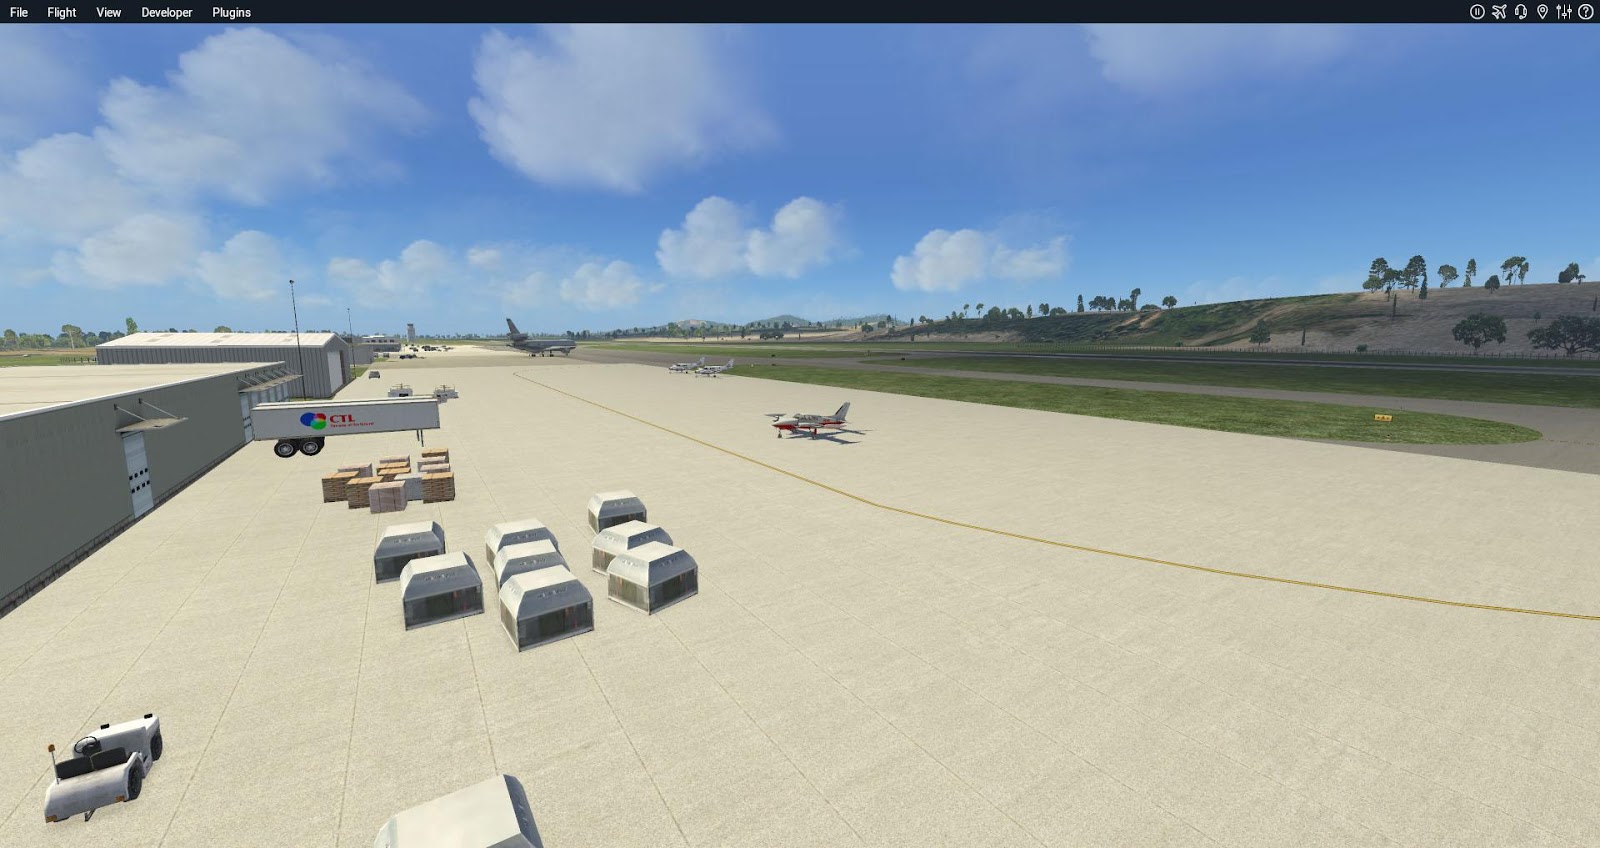
The three options are, “Live Weather”, “Historical Weather” and “Custom Weather”. These are self-explanatory, but I will review them later but for now, make sure the “Live Weather” is active. Now would be the time that you would develop a flight plan which I will detail in the next section. Before moving on I want to take a closer look at the “Home” page and the toolbar that is always visible on all the Active Sky open pages. I am currently parked at TISX airport in the U.S. Virgin Islands. If the simulator is loaded the top left of the Home page will display the current weather conditions where your aircraft is located. The top right will contain some basic information about Active Sky. Active Sky XP is compatible with Navigraph so if you subscribe to this you can update the AIRAC from 1601 to a current navigation database. The middle area provides the latest Active Sky News and if there are named hurricanes anywhere. The bottom area contains METARS for 5-7 preselected favourite weather stations or airports. If you would like to see different stations here, enter different airports on the “Conditions” page select “Save as Favorite” and the first 5-7 of your favourites will be displayed.
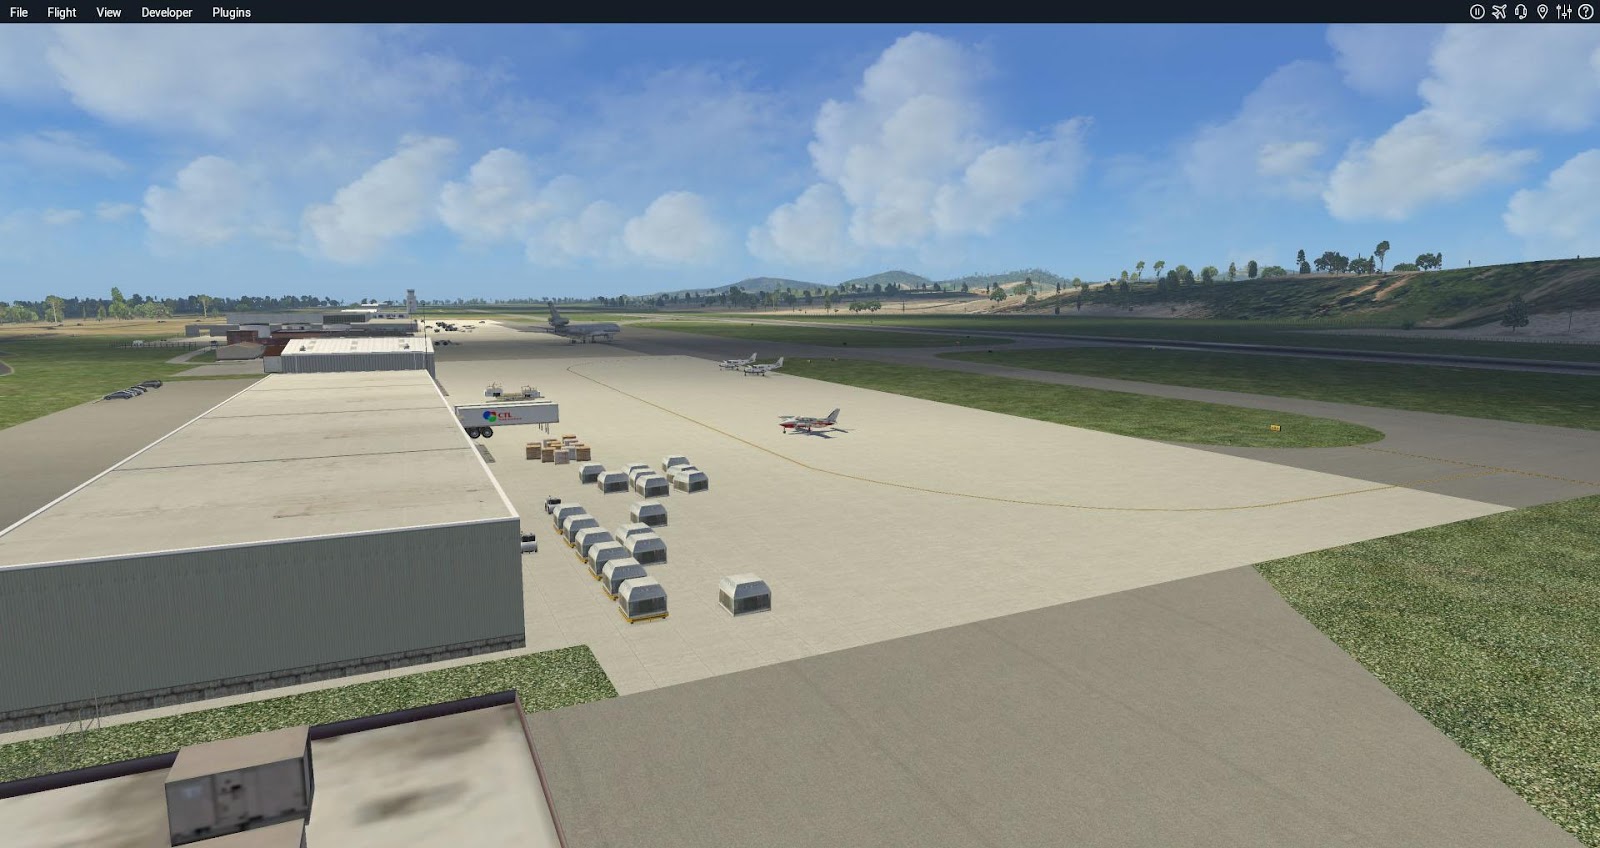
I have captured a couple of screen grabs of both the high resolution and high-performance textures to compare the two. The conditions and textures match the weather report which is great. Some people may not like the included cloud textures, but I like them, and Ultra Weather XP may have some influence also. The first screen grab below is with high resolution and the next is the high-performance textures. Personally, I cannot see much of a difference, maybe the high resolution displays more clouds for a more realistic look. Performance wise they were both about the same on my machine, but this could change if flying in a dense area with lots of clouds. For the rest of the review, I will be using the high-resolution textures.
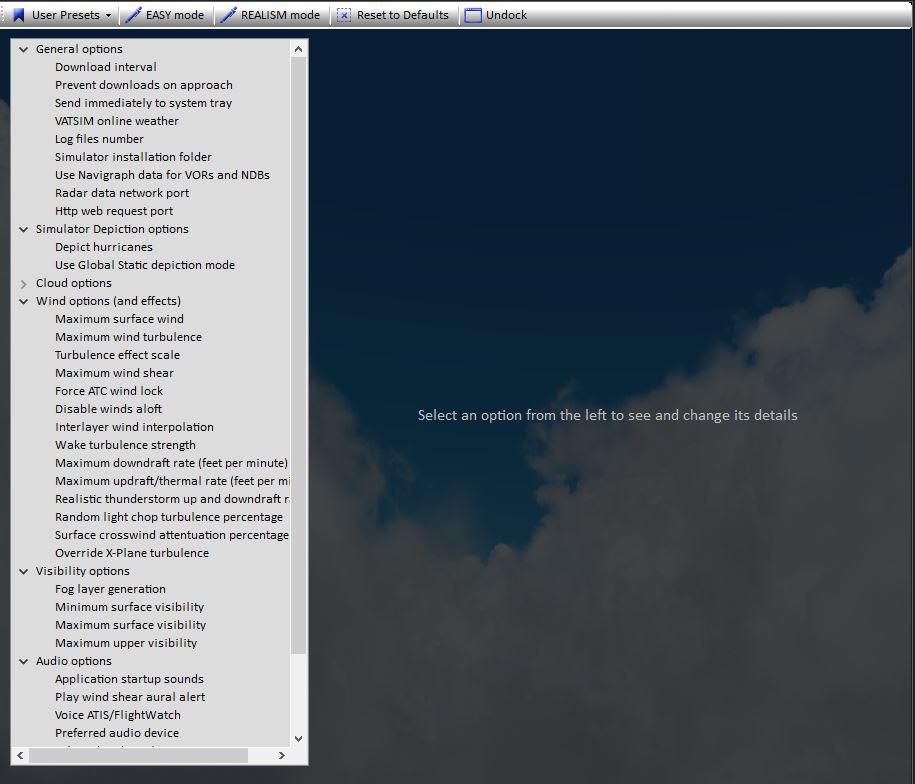
The left side of the program interface is the toolbar. I have already commented about “Textures”. At the top is “Options” and as the name suggests, allows you to customize the various ASXP options. If you like to experiment with how the program looks or works, this is the place to create your custom settings. I really like that this is included for those who want more control. I personally do not like to mess with this, even with the Prepar3D program but its there for those that like to try different settings. Across the top of the “Options” page are some tabs to select. “User Presets” which allow you to load and save your custom settings. “Easy” or “Realistic” modes when selected preselects certain options for an easy or more challenging/realistic flight experience. This mostly deals with how realistic winds, wind shear, turbulence, icing & wake turbulence are depicted as well if you want the weather to be updated on approach (realistic) or prevented (easy). The other options along the top is “Reset to Default” and “Undock Window” which is included on all the open windows.
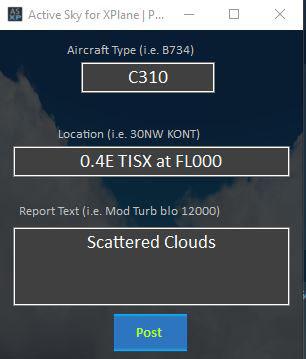
HiFi Simulations recommends “Easy” mode for inexperienced simulator users, but I will be using “Realistic” mode because if conditions are bad enough, I can decide whether to fly or not after planning the flight. “Logs” & “Debug” are used for debugging purposes. “PIREP” allows the simulator pilot to file a pilot report on the Active Sky Network for other users to see (must be connected and in Live mode). These will be displayed on the map with the Sigmets/Airmets/Pireps overlay displayed. I like this real-world feature is included with the flight simulator product. Lastly, “Help” opens the User Manual.
Flight Planning, Conditions & Map
What I believe sets Active Sky XP apart from the other X-Plane weather generation programs is the flight planning component. I have not used every option on the market so if I am wrong, forgive me. Select “Flight Plan” to start the flight planning process. First in order to have the most accurate results, enter your desired climb & descent airspeeds and rates for your aircraft and the cruise altitude. The rest is self-explanatory, enter your departure and destination airports along with an alternate if you want. Continuing the tour of my Caribbean tour with a short flight between, Henry E. Rohlsen Airport (TISX) in the U.S. Virgin Islands and Virgin Gorda Airport (TUPW) in the British Virgin Islands.
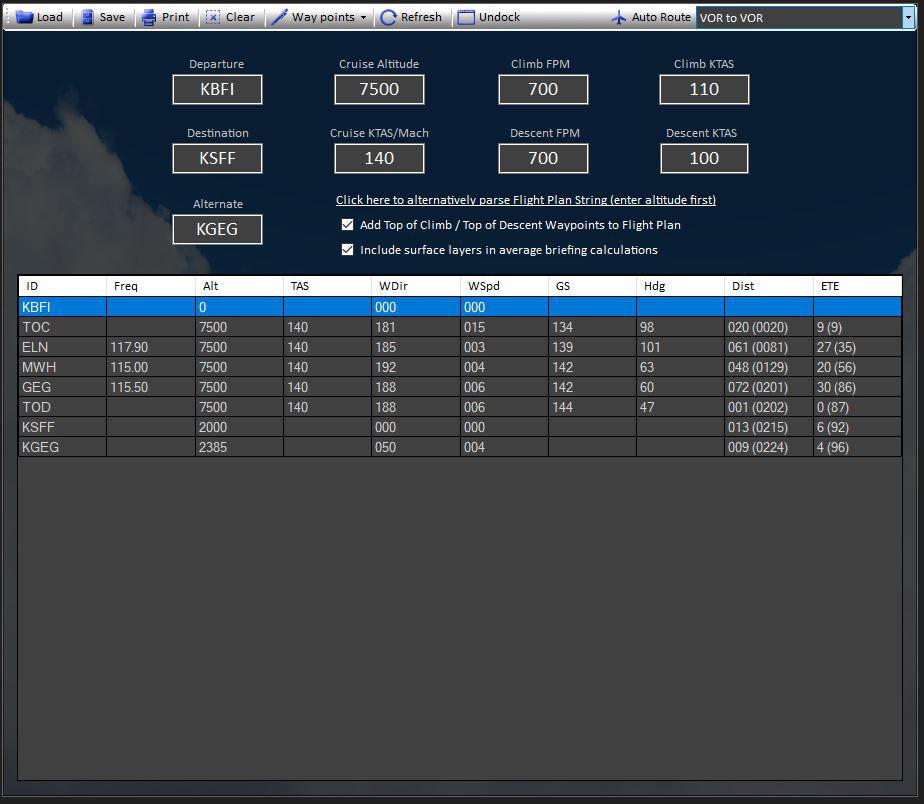
Before creating the route, I recommend enabling “Add Top of Climb/Top of Descent to Flight Plan” and “Include Surface Layers in average briefing calculations” for a more detailed flight plan and briefing. There is also an option to use a textural flight plan string for the route if your external flight planning program generates one. The top right of this window contains a drop-down menu for the preferred routing type, “Direct/GPS”, “VOR to VOR” and “VOR and NDB” for generating an automatic route for your flight plan. This is a very short flight, so I am going to select “Direct/GPS” for the flight and the basic flight plan is displayed below. The last two screen grabs of this section I will post a more complex flight plan between Boeing Field (KBFI) in Seattle, Washington and Felts Field (KSFF) in Spokane, Washington and will use both other routing options. KBFI to KSFF did not include NDB’s so I also posted a flight plan between KSFF to Redding Municipal Airport (KRDD). I live in Seattle and have relatives in Spokane, so this is a flight that I often make after installing a new aircraft into either of the simulators that I own.
It would be nice if Active Sky XP would include airways as a routing option, but this is where the other options at the top can be used. The “Load” option allows you to load an X-Plane formatted flight plan, helpful if you have a complex flight plan from another flight planner saved in the X-Plane format. “Save” saves the Active Sky flight plan to the simulator, “Print” to print the NAV log and “Waypoint” allows you to add a waypoint to your plan. Unfortunately, this only allows navigation waypoints and not airports so if you want a to have a multi-leg flight plan you will have to use an external flight planner. Finally, “Refresh” recreates the flight plan if you make changes to any of the basic settings.

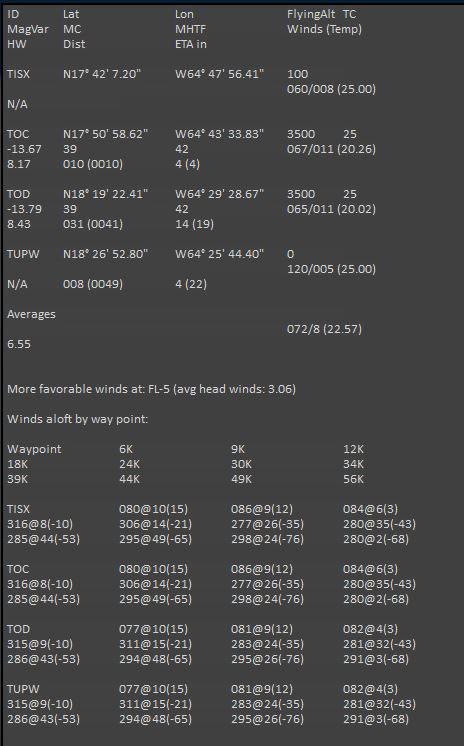
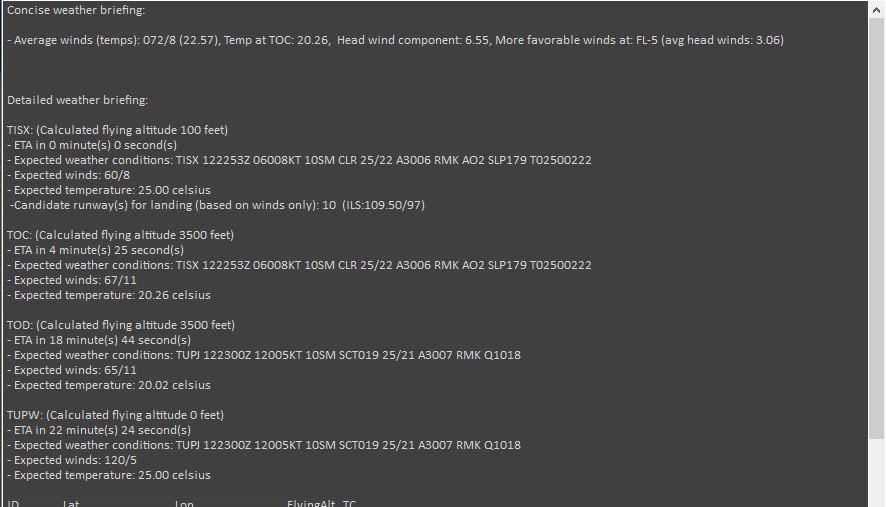
Selecting “Briefing” will open a weather briefing page for your route. What I really like about the Active Sky program is that you also listen to a voice briefing by selecting “Play Voice Briefing”. The text briefing states at the top that there are more favourable winds at 500 feet lower than my selected 3500-foot cruise altitude. I adjust my cruise altitude to 3000 feet and the favourable winds have changed to 2000 feet and since the terrain is not going to be an issue, I enter 2000 for my cruise altitude for this flight. I like this level of realism, just remember that you are still the simulated pilot in command, so you need to make the realistic assessment of your cruise altitude. If you will be flying in mountainous regions you probably will start with a higher altitude to begin with.
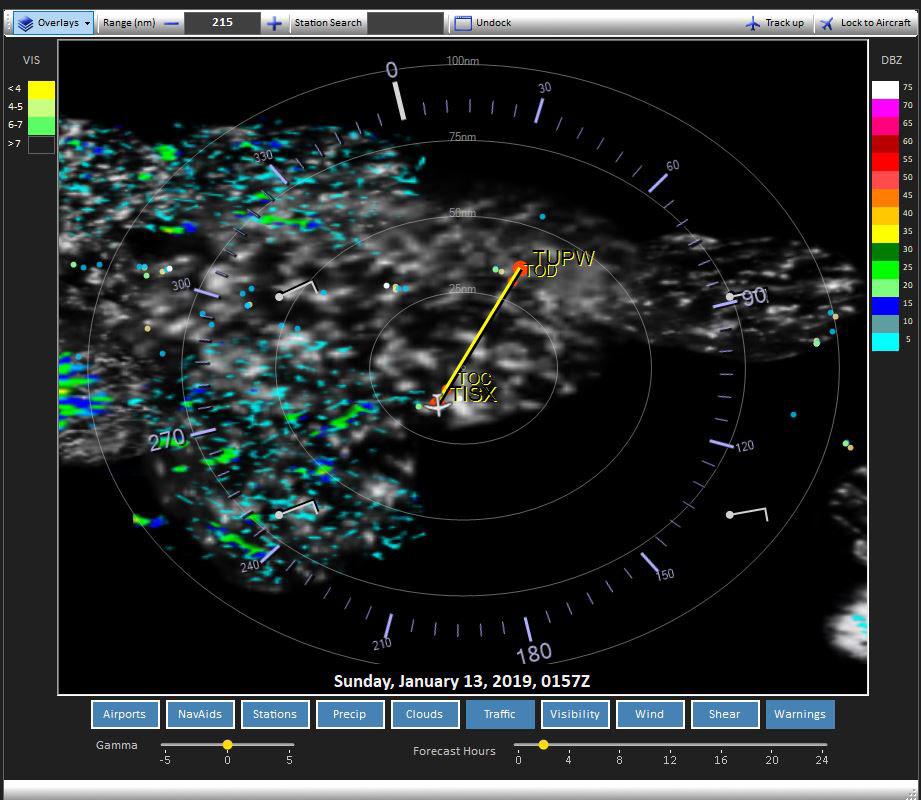
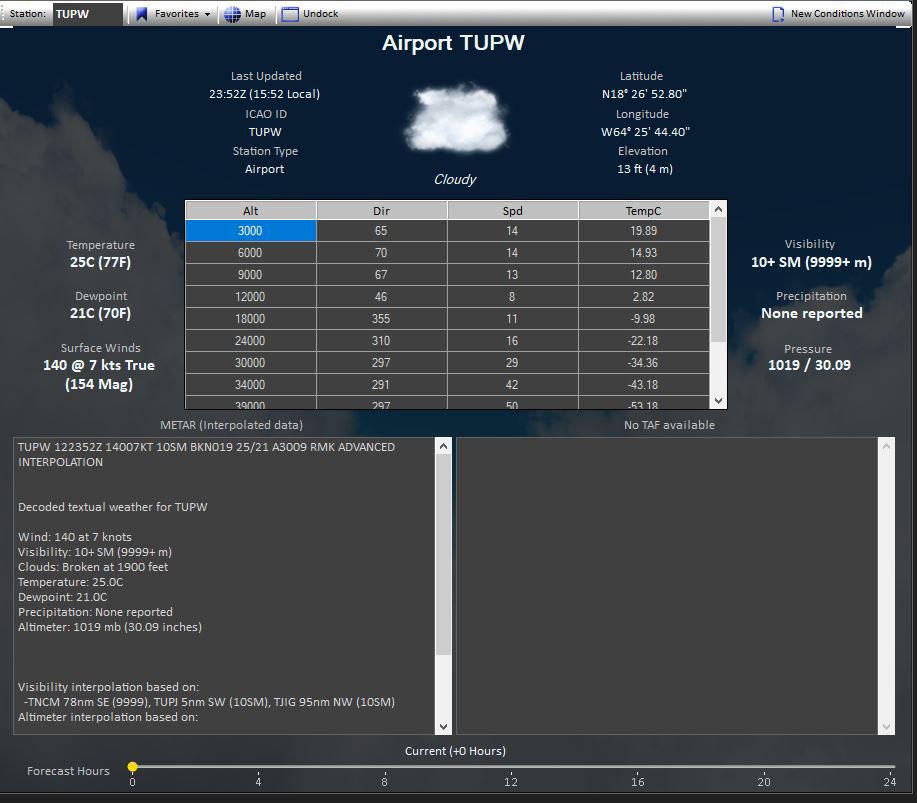
Selecting “Map” will open a weather map that will display the conditions for the route. If you had previously checked the conditions at another station you may need to enter your departure airport in order to see your flight plan displayed. At this time the weather looks good on the map but along the bottom is forecast hours slider so just as in the real world, you can move this slider to see your conditions later in the day. This is especially useful for those long flights. If I were to delay my flight, clouds would start to move in. The map is self-explanatory, simply select which conditions or overlays that you would like displayed. There is also a drop-down menu at the top to perform the same function and you can also select the map background colour that pleases you. The “Conditions” window is nice to get a quick look at the weather conditions for my departure and destination airports. In the simulator, I see that the conditions match the weather report. The Conditions window also allows you to add favourite airports to display on the home page as well as displaying winds aloft, the decoded METAR, Terminal Area Forecasts and has the forecast hours slider. This may be too much control for some people, but I like them, and they are very easy to use.
Before moving on, I want to quickly describe the realistic audio weather reports that are included that can be heard through the aircraft’s communication radio. I find these more useful than selecting conditions from the simulator map view.
- 122.00 – Local weather conditions like ATIS. You still can receive accurate ATIS broadcasts on the simulator ATIS frequency but there may be some discrepancies because of the simulator’s lack of knowledge of ASXP weather parameters.
- 122.02 – Destination weather report like Flight Watch but will only be enabled with an Active Sky flight plan.
- 122.05 – Full voice weather briefing of an active flight plan.
- 122.07 – “Wind Check” (current surface wind direction and speed), should be tuned when approaching the active runway at approximately 1000 and 500 AGL.
On the flights that I have completed so far, the XP ATIS was the same as Active Sky but the issue that I have had is with the weather generation process. Weather generation is not very smooth, ASXP will clear the weather for a couple of seconds then generate the new weather for the area. I would prefer a more seamless transition between updates. This is annoying but at least XP did not pause while this is happening which is nice. The good news is that HiFi is working on a major update that will fix this as well as other fixes and should be out before this is published.
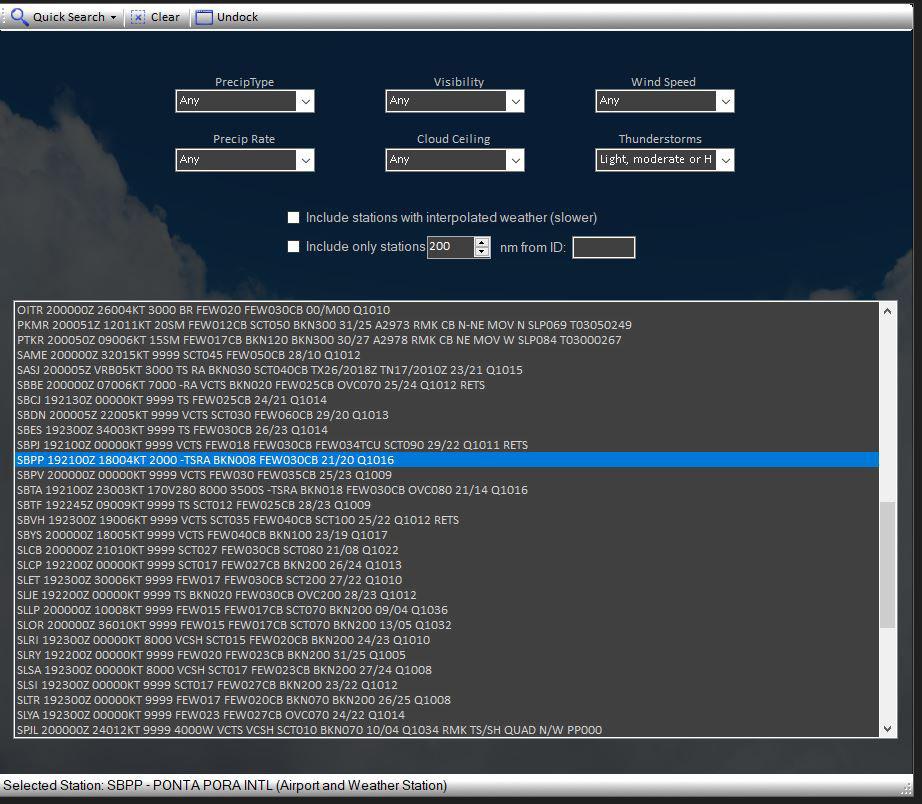
Searching for Weather
Flying with live realistic weather is practical but boring especially if continually fly out of an area with sunny skies and calm winds year-round. That is where searching for weather will enhance your X-Plane experience. Pressing the “Search” tab will open its window. The first thing that I wanted to do is to try to capture a shot of lightning conditions in the area to use at the top of the review. The middle area of this page is where you select what type of weather you are looking for. For this example, I used the “Thunderstorms” drop-down list and selected the bottom option “Light, Moderate or Heavy” because at this time I only have North and South America installed in the simulator so hopefully this will provide an airport with some form of thunderstorm activity with my installed scenery. The results will be displayed as METAR’s on the bottom half of this window. If you do not know how to decode this type of weather report, double-clicking on any of them will open the “Conditions” window with the decoded results. I found thunderstorm activity at Ponta Pora Airport (SBPP), which I load into the simulator. I love how easy this program is to use.
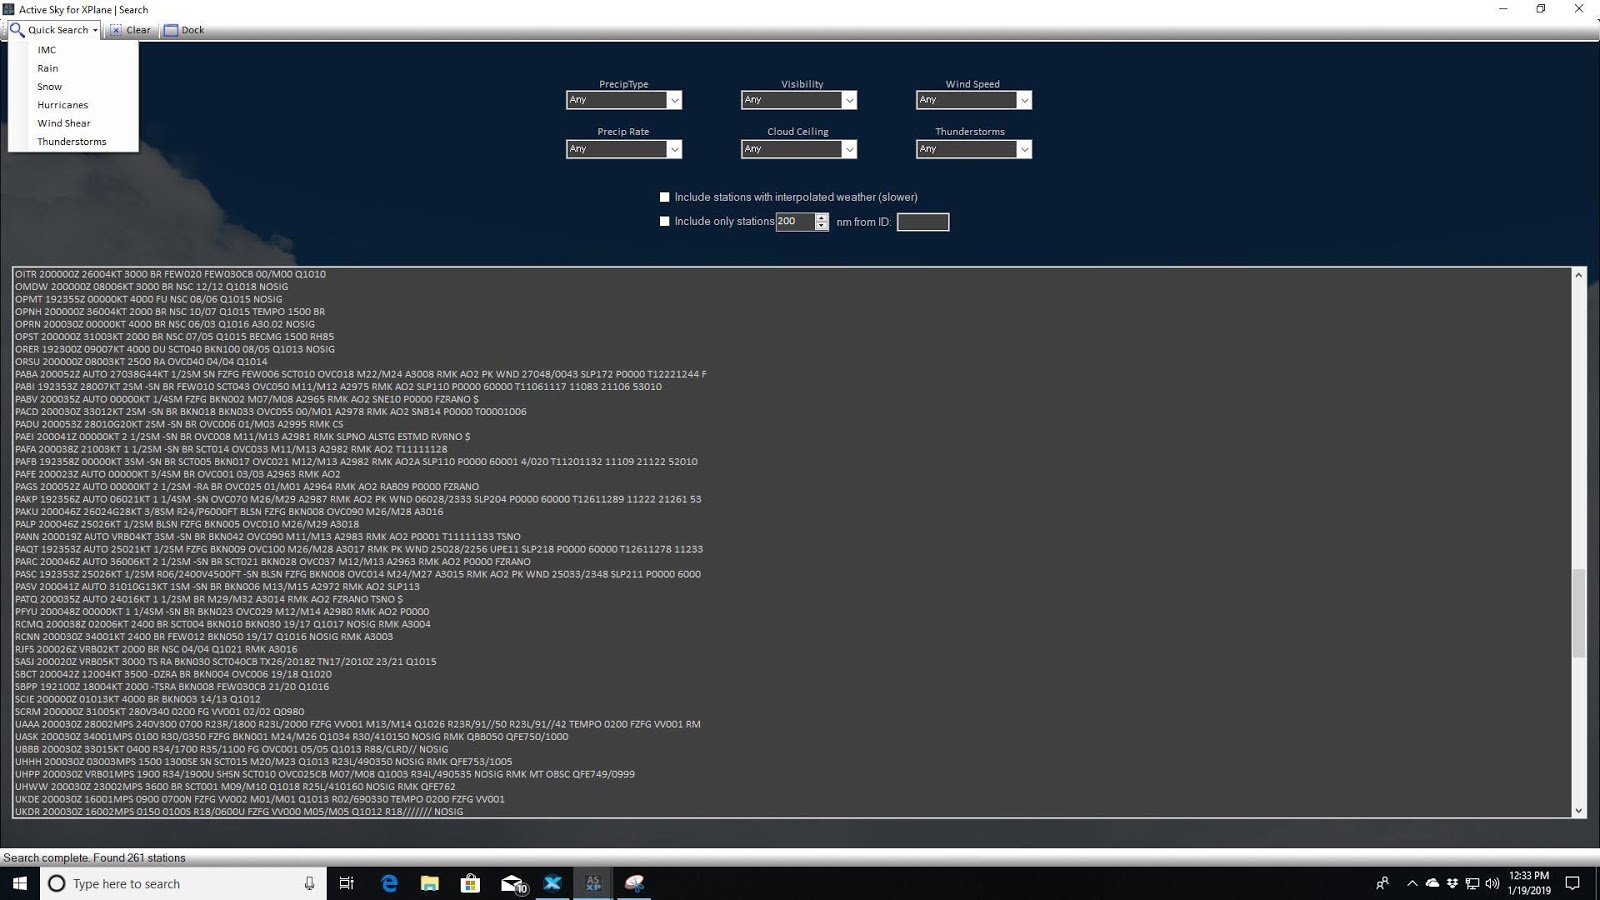
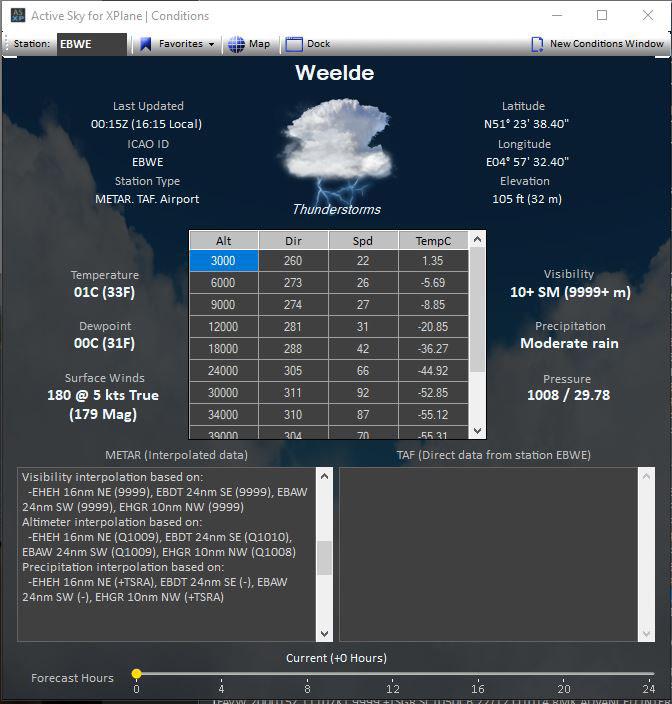
If you just want to fly with live weather, have the “Live Weather” mode selected, load or create a flight plan, look or listen to the briefing and if you want to look at the Map and Conditions windows, load the simulator and fly. I also like this level of realism that this brings to the simulator. Finding other weather conditions is equally easy just select any combination from the drop-down lists to find that type of weather to experience. Selecting “Quick Search” at the top of the windows allows you to quickly find other weather conditions not included in the drop-down selections including, IFR Conditions, Hurricanes and Wind Shear. Below the drop-down selection boxes are two options to customize the weather search further. If you want to include stations with interpolated weather, select this option and I have included a screen grab of the Conditions page of a station using advanced interpretation for the weather report.
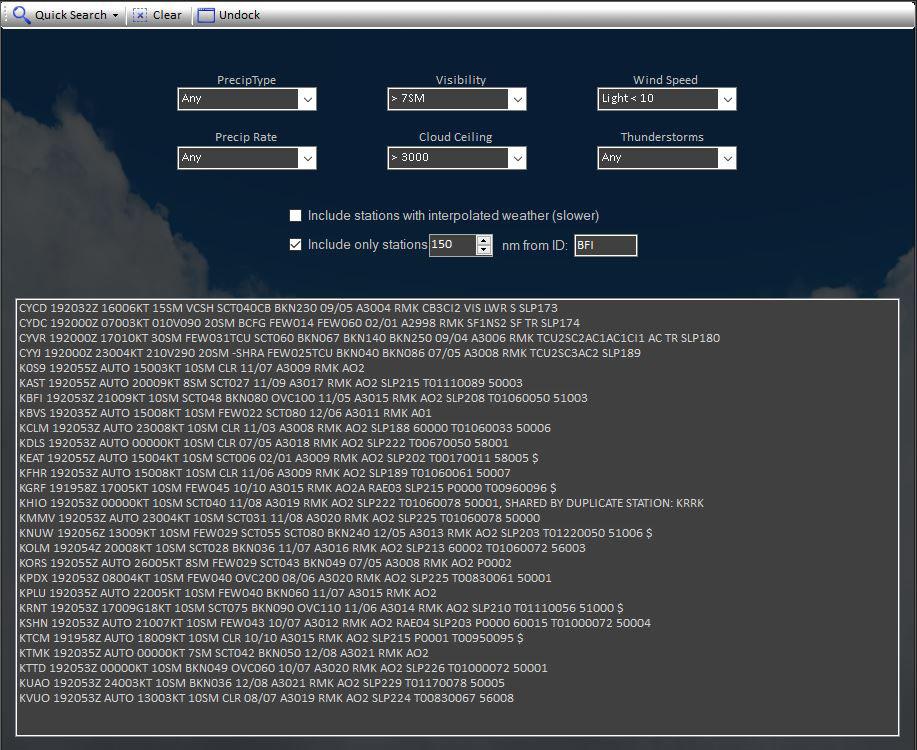
The other option is nice if you want to just see the reported weather within so many miles of the entered station, just remember to change all the drop-down lists to “Any” or this function will not work. This would be useful for preliminary cross-country planning to see if it is even practical to fly with realistic weather. For this example, I am going to use my local airport King County International Airport (KBFI) and see what is happening up to 150 NM from this airport. Just remember that if the simulator is connected, Active Sky will be using the current simulator time so the results could be incorrect if you do not have “Current Date and Time” selected in the simulator.
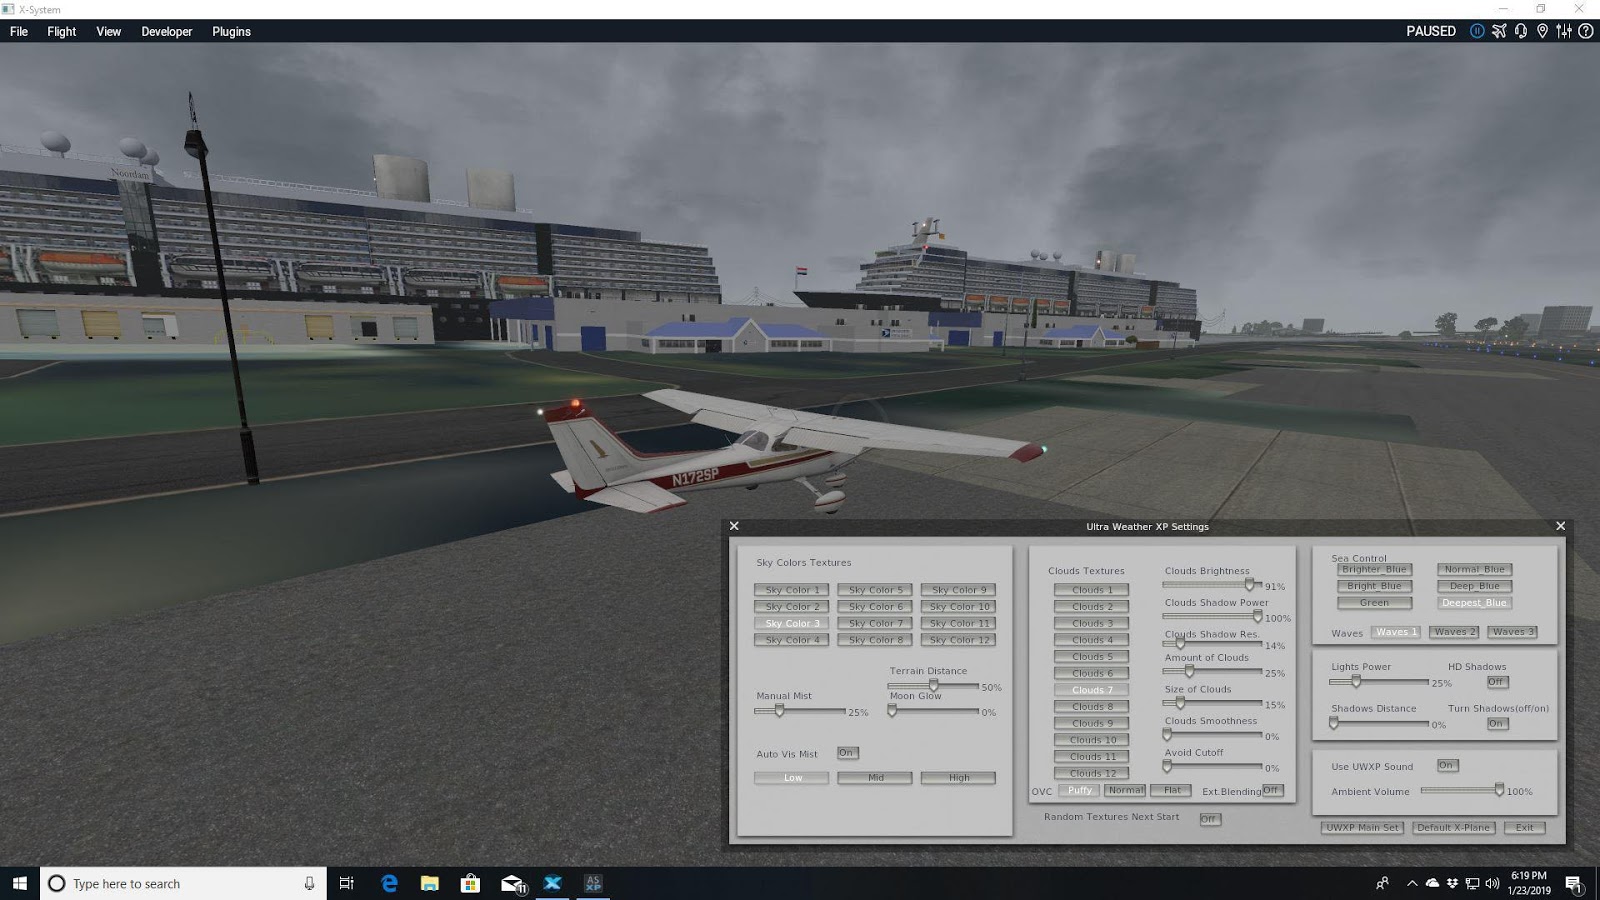
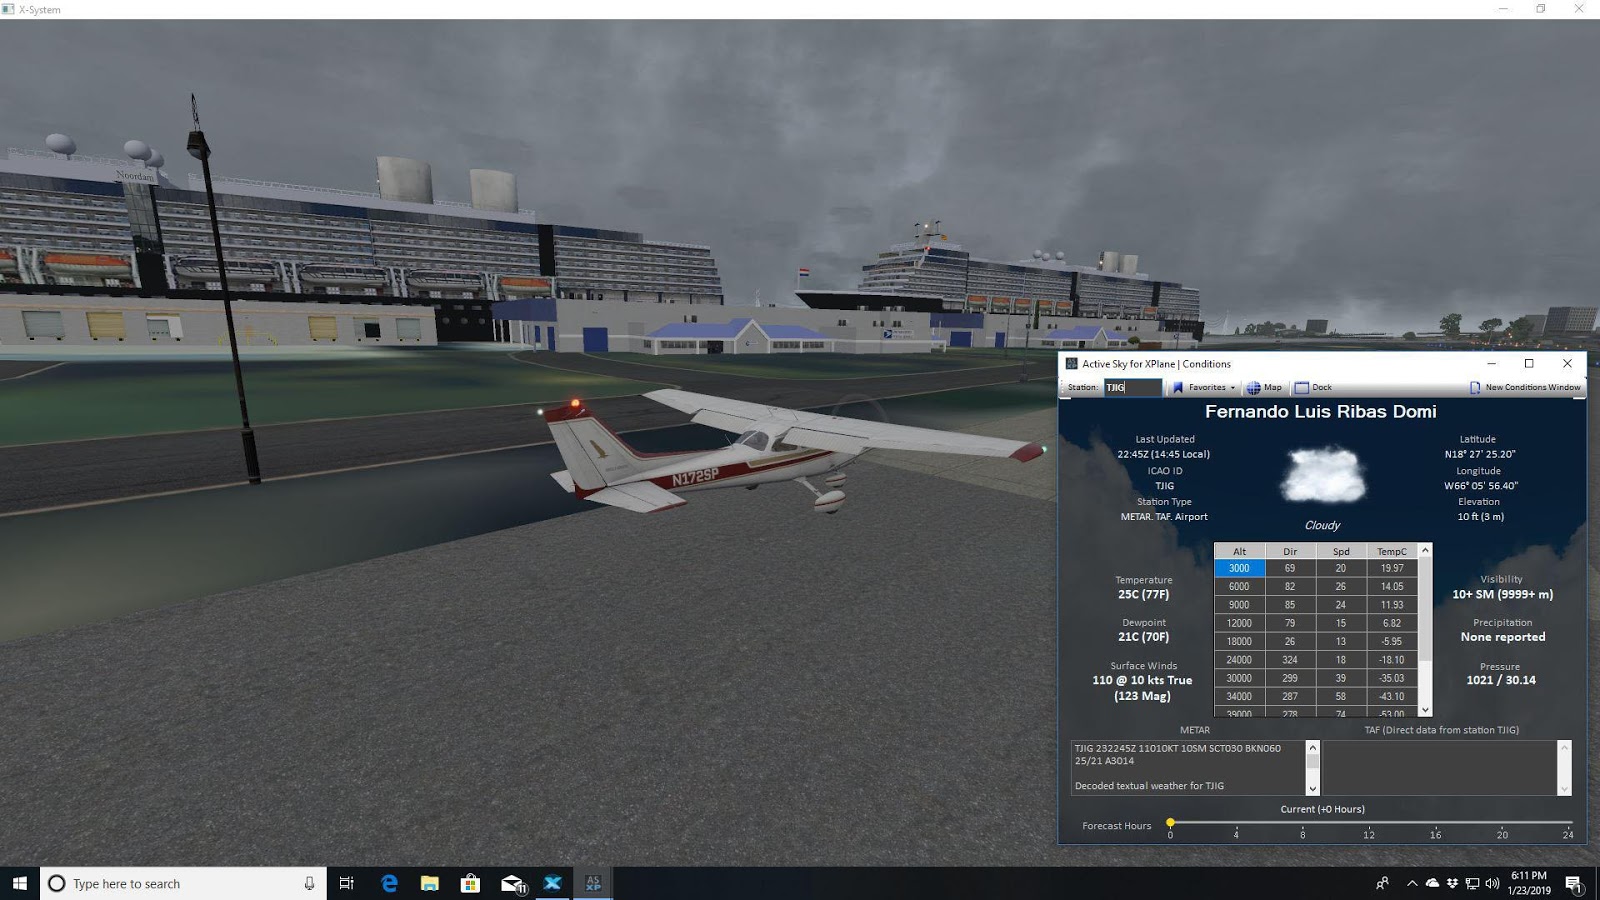
Before reviewing the Historical and Custom weather features, I want to first capture a screen grab at the airport that I currently parked at, Fernando Luis Ribas Dominicci Airport (TJIG) in San Juan, Puerto Rico. The screen grab provides a good example of what an overcast day looks like with ASXP and Ultra Weather XP installed. I also captured a screen grab of my Ultra Weather XP settings. I am also using ASXP’s realistic mode and on my flight to this airport, the in-flight weather report reported wind gusts of up to 22 knots which I felt while hand flying my simulated C172, I love this level of realism that this program brings to the X-Plane simulator.
Historical & Custom Weather and the ASXP Weather Companion
Let’s say that with live weather enabled and the conditions are less than ideal for VFR flying. Select “Historical Weather is Active” from the “WX Control” window. This mode lets you select a date and time, up to two years, to find more suitable conditions. You can also change the date and time in the simulator and if that option box is checked in ASXP, this will force the program to use the simulators custom date. X-Plane only allows you to go back twelve months, so the choice is yours, which is wonderful. Just remember to switch back to live weather after you have used the historical or custom weather modes. If you like to create custom weather, select “Custom Weather” from weather control window which is created from the Map window. Simply right-click somewhere on the map to create a custom weather area and repeat for multiple areas. There are a couple of different methods for creating your custom weather, either by manually setting the individual weather parameters which is very easy, just enter your settings on each page. A more complicated option is to create or edit the included textural METAR report or just paste one from another source.
If you really want to have some fun, select “Load Preset” to load any one of the seven presets included with the program including “Hurricane Blast”, which I am going to try at my local airport, KBFI. Below you will see what happens to a C172 which was not tied down or in a hangar with sustained winds of 60 knots and gusts up to 99 knots in X-Plane 11. I love the XP11 special effects! Finally, if there were not already enough features to use, the included Weather Web Companion program allows you remotely connect to a connected ASXP in any browser on any device that is connected to your home network. Basically, this allows you to view the map and briefing in a web browser. It also allows you to create custom weather but is not as extensive as the full program. I will probably not use this because I could only connect from my computer and not my iPad (did not want to take the time to fix this), and I can already see all these features from full program. This could be useful if useful if you have another person editing the weather from another computer in your home.

Conclusion
I use Active Sky for the Prepar3D simulator, so I knew what to expect and it did not disappoint. All the features that I use that make Active Sky my favorite weather generator for P3D has been included in Active Sky XP. I like having a weather preflight planning feature as part of a weather program for added realism. If the current weather is not optimal for flying today, ASXP allows you to create your own custom weather or you can select historical weather up to two years in the past. The program only allows flight plans between two airports with navigational aids as waypoints, but it is compatible with Navigraph if you want the most current navigation database or you can use the simulator database. It would be nice if you could add more airports (you can add navigation waypoints) but you can load an external flight flan with a custom flight plan (I use Little NAV Map). It includes optional cloud textures which you may or may not like, I like them, but the choice is yours. The program is compatible with other texture plugins so try out a combination to see what works for you.
Performance on my system was very good but like everything simulator related your results could be different. Which brings me to the biggest issue with the current version, there is not a smooth transition when injecting new weather. For a program for with so many realistic features, having the sky change to clear before loading the next weather area is just wrong. The good news is HiFi Simulations is working on a major service release fixing this issue and other issues that have been reported by users. So, who should go out and purchase this program? If you are a P3D virtual pilot, new to the X-Plane simulator and have used Active Sky, then it is easy, purchase the X-Plane version because you already are familiar with it. It becomes more difficult if you already have another weather program installed. First, as with the other weather programs, ASXP cannot be used at the same time as other weather programs so if you have one you like, keep it!
The nice thing about Active Sky XP is that it is an external program, so it does not start automatically with the simulator so if your environmental program uses the simulator live weather, (just loads textures), you probably can keep both. I still recommend Active Sky for all users because of the included features. This program is not inexpensive at $39.99 but as I am writing this, some of the vendors have already had it on sale. Which brings me to the other minor issue with this program, it is not currently sold at either of the known X-Plane storefronts; X-Plane.org store, X-Aviation.com, or the Threshold Store. Again, HiFi Simulations are looking into adding more stores so hopefully, these stores will be added in the future. I want to thank HiFi Simulations for providing the review copy and for more details visit the product page here.
Test System
Hardware:
- Intel i5 4670K 3.4Ghz Non-OC Processor
- 8GB DDR3 1833 Memory
- 2TB SATA HD (7200 RPM)
- NVIDIA GeForce GTX970 Video Card with 4GB GDDR5 Memory
- Thrustmaster T-1000 Joystick
- Goflight GF-166 Radio Panel and SECM Single Engine Control Module
Software:
- X-Plane 11.30
- Windows 7 – 64 Bit
- Ultra-Weather XP
- Various Premium & Free Aircraft
- Too many free & premium plugins to list..
Share this page


COMMENT ADVISORY:
Threshold encourages informed discussion and debate - though this can only happen if all commenters remain civil when voicing their opinions.